The Knowledge Base (aka ‘KB’) tab presents all knowledge of your website in a format that the Chatbot(s) can understand and query during a user conversation. The Knowledge Base is populated and updated automatically by the Site Crawler. You can search or query (like a Chatbot would), and also manually create, update and delete entries in the Knowledge Base, and even upload a batch of knowledge using the File Upload feature. Here are the details of the UI:
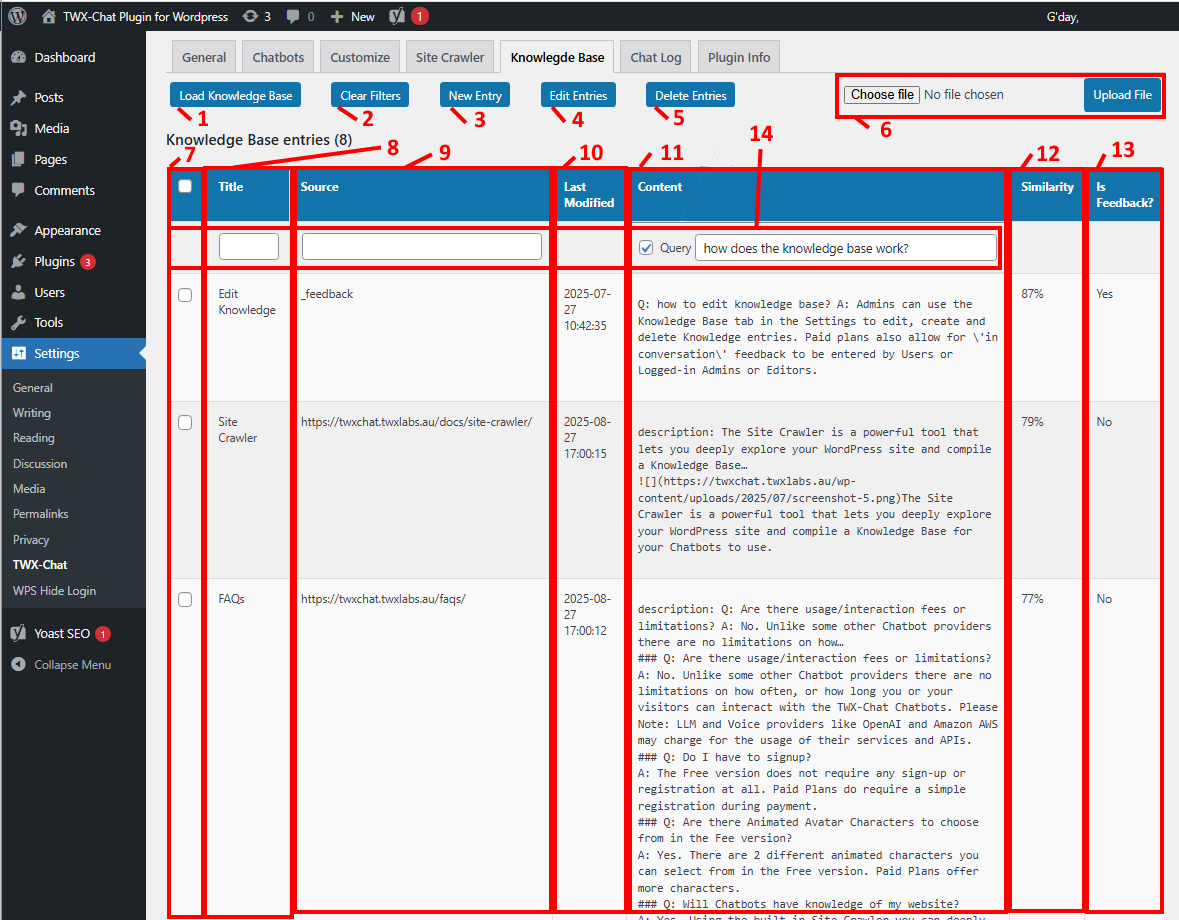
- 1 – Load Knowledge Base button: Loads/refreshes all the KB entries into the results table.
- 2 – Clear Filters button: (only visible if filters exist) removes any filters and refreshes the KB entries.
- 3 – New Entry button: When this button is clicked, a new blank ‘feedback’ KB entry appears at the top of the table. Also a ‘Save’ and ‘Cancel’ button appears at the top. You can enter a ‘Title’ (which will be shown in the Chatbot Sources/Flashcards during user conversations), a ‘Source’ (defaults to ‘_feedback’ but you can change this to a valid URL if you prefer which will be the target of the ‘Title’ hyperlink during conversations), and some ‘Content’. Content should be simple text or markdown that represents knowledge of that Title/Source pair. For a ‘_feedback’ KB entry, typically you would enter knowledge in a Q&A format (eg: shown above on the top line). Click ‘Save’ button when done. This entry will be part of the Chatbot(s) knowledge immediately.
- 4 – Edit Entries button: Select one or more KB entries using the checkboxes on the left (#7) and this button will appear. Clicking it will open each entry within the table in edit mode. ‘Save’ and ‘Cancel’ buttons will also appear. Edit the KB entries as per the ‘New Entry’ process above (#3). Changes will be available immediately to the Chatbot(s).
- NOTE: Typically you would only edit KB entries that were manually created or generated using the Pro Plan ‘Allow Feedback’ feature (ref Chatbot Settings tab), otherwise these entries may get overwritten by the Site Crawler. If content appears incorrect, it is recommended to change the content in the source Page/Post instead of the KB.
- 5 – Delete Entries button: Select one or more KB entries using the checkboxes on the left (#7) and this button will appear. Click this button to remove any unwanted KB entries. You will be asked to confirm this action.
- NOTE: Typically you would only edit KB entries that were manually created or generated using the Pro Plan ‘Allow Feedback’ feature (ref Chatbot Settings tab), otherwise these entries may be regenerated by the Site Crawler. If you wish to remove this generated KB entry permanently, it is recommended that you delete the KB entry here and also remove the source Page/Post so the Site Crawler doesn’t traverse it. The Pro Plan also allows you specify a sitemap during Site Crawl which is another way of ensuring the Page/Post is not traversed.
- 6 – File Upload feature: You batch upload knowledge to the KB using this feature. You will to have create a text file in the same format that the Site Crawler does, which is essentially markdown with ‘title:’ and ‘source:’ identifiers within it. Take a look at the Site Crawler doc to see how to get a copy of the markdown file it produces so you can copy it.
- 7 – KB Entries selection: Select KB entries you wish to Edit/Delete.
- 8 – Title column: The Title of a KB entry will be displayed during a Chatbot conversation within the ‘Sources’ and/or ‘Flashcards’ areas on the screen (if switched on for that Chatbot). They will appear as bold hyperlinks.
- 9 – Source column: Sources are the ‘Title’ hyperlink targets that open in a new tab, see above point.
- 10 – Last Modified column: This tells the Admin when the entry was last created/modified (ie: manually or via the Site Crawler).
- 11 – Content column: This is the actual content of the KB entry that is queried during a Chatbot conversation. Typically it is simple text or markdown format. The Site Crawler does it’s best to strip out Header, Footer, HTML tags and other unwanted content. It will leave images in however in markdown format as these can be displayed in Flashcards during Chatbot conversations. Under the hood, an OpenAI Embedding is created for each Content field and is used during queries.
- 12 – Similarity column: If using the Chatbot Query simulator (see #14 below), this will be populated with the similarity % matching the query entered.
- 13 – Is Feedback column: Indicates ‘Yes’ if this KB entry was generated during a conversation using the Pro Plan ‘Allow Feedback’ feature in the Chatbot Setting tab. You can also create your own feedback KB entry manually within this tab (as per #3 above)
- 14 – Filter/Query feature: You can filter your KB search results using the input fields in this area. Simply type in a full or partial search term in the desired field and wait appx 1 second and the KB will refresh.
- Chatbot Query simulator: If you want to ‘query’ the ‘Content’ column just like a Chatbot would (handy when testing your Chatbot’s responses), you can check ON the ‘Query’ checkbox in this column and enter a query like the one shown above. The system will then perform a Vector search against the KB and results will be returned with % values in the ‘Similarity’ column with the most similar hits at the top. You can use these similarity values to ensure your ‘Min. Similarity’ setting (in the General Settings or Chatbot Settings tabs) is correct.