Learn how to create and customise your chatbot settings with TWX-Chat. From avatar selection to voice configurations, tailor the AI to your needs.
When creating a Chatbot there are a number of settings to choose from in order to make your Chatbot behave the way you want it to. Feel free to play around with different settings until you get the desired results. A good idea is to create a Private Page on your Website and place the Chatbot shortcode in there and test it out from there without live Users accidentally discovering it. Then simply make the page Public (or move it to the Front Page) when you are ready. You can even create a copy of the Live Chatbot and perform the same process again to test changes, then just make those same changes to the Live Chatbot when you are ready. It’ll all make sense soon, let’s dive in…
The Chatbot List
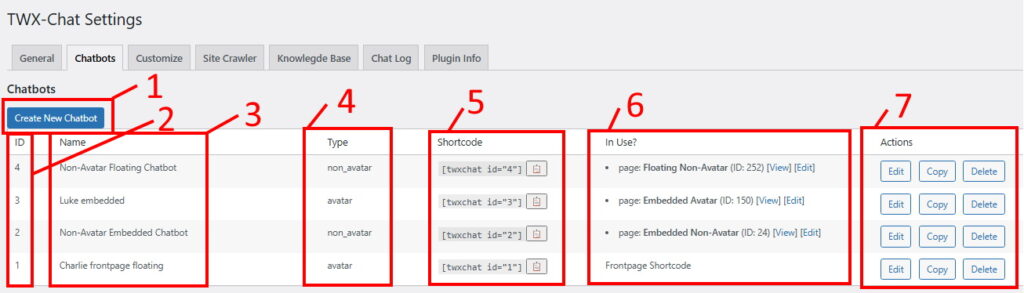
The Chatbot list contains all your current chatbots. The Free plan lets you create up to 2 chatbots, whilst the paid plans allow unlimited chatbots to be created. To create a new chatbot simply click the ‘Create New Chatbot’ button (1) and the chatbot editor will open. The same editor can be opened by clicking ‘Edit’ in the Action buttons (7) next to the chatbot on the right. The settings in the chatbot editor are described in the next section below. The Chatbot List table has 6 columns:
- ID (2) – This is automatically assigned and is used in other parts of the plugin like the Chat Log and the User Fields Update Webhook (see next section).
- Name (3) – A descriptive name of the chatbot used purely in this Table.
- Type (4) – The ‘Chatbot Type’ as per the chatbot settings below.
- Shortcode (5) – The shortcode to place in the page/post you want to display the chatbot. Use the clipboard button to copy the shortcode onto your clipboard for easy pasting, including into Front Page shortcode setting in the ‘Customize‘ tab.
- In Use? (6) – A quick summary of where this chatbot/shorcode is in use on the website and links to those pages.
- Actions (7) – Action buttons for the corresponding chatbot. Use the Edit button to make changes to an existing chatbot. Copy an existing chatbot to a new name, or Delete a chatbot. Note this does not remove the shortcode from the target page/post.
Chatbot Settings
After clicking ‘Create New Chatbot’ (1) or clicking ‘Edit’ action button (7), the following settings will appear.
Common Chatbot Settings
- Name (mandatory) – a name to identify your Chatbot amongst any others you create. It will be included in the Chatbot List.
- Chatbot Type – ‘avatar’ or ‘non_avatar’. Avatar type will display an animated Avatar Character (and optionally a Conversation Panel if there is enough width space), whilst a Non-Avatar will display the Conversation Panel only (Text based).
- Style – select either ‘floating’ or ’embedded’ from the dropdown list. Floating chatbots appear ‘floating’ in a window in the lower right hand side of the page. Embedded chatbots are placed in between other content on a page. If you plan on presenting a QRCode or link to someone to present the chatbot on it’s own, we recommend using Embedded style, whilst Floating style is best for the Front Page or on a page that has a lot of content that you want the user to be able to scroll through whilst still seeing the chatbot.
- Floating Title – (visible only if ‘floating’ style was selected). A short title that appears inside the floating chatbot’s ‘restored’ and ‘minimized’ state window. Keep this short and simple, eg: ‘Chat with Charlie’, or ‘Ask me anything’ etc.
- Starting Comments/Greeting – Text that will be displayed in the Conversation Panel (if visible) and also spoken by the Avatar after the ‘Start’ button is clicked. This can be the same as Floating Title or something different. We recommend this be short but engaging and clear in it’s intent. If you are using ‘User Fields’ (see below, paid plans only) this could be a question relating to the first field you wish to collect, eg: ‘Hi I’m Charlie. What’s your name?’ etc.
- Common Questions – Any text in here will appear as clickable Common Question buttons in the Conversation Panel of the chatbot. To add multple buttons, separate the questions with a comma (,).
- Extra Instructions to AI Engine – (also referred to as the System prompt). This text will be seen by the AI (LLM) for every message the user sends. It should specify, in natural language, the tone and objectives of the chatbot. eg: “You are a helpful and witty chatbot called ‘Charlie’. You know all about the Widgets on this website and your objective is to help the user evaluate and select the best Widget for their needs”. Note, if using User Fields (see below), there is no need to add any special instructions for these. They will be included automatically.
- OpenAI Model – Select the OpenAI LLM model to use for this chatbot. Generally use ‘mini’ models if you don’t need the chatbot to be too ‘worldly’ in it’s knowledge outside the contents of your website. ‘mini’ models are generally cheaper also. Otherwise if your website doesn’t contain all the knowledge you want your chatbot to talk about, then choose one of the other models. More info here.
- Knowledge Base or OpenAI Assistant – Choose whether the chatbot gets it’s knowledge from the local Knowledge Base (default) or from a previously created OpenAI Assistant.
- Knowledge Base chatbot settings
- Knowledge Base Source Filter – If you want your chatbot to filter it’s knowledge on a specific subset of the Knowledge Base (such as just your Technical Docs, or Blog etc) you can enter a filter in this setting. You can also enter multiple filters separated by a comma, for example: “blog,docs” will only search Knowledge Base entries that have a Source containing “blog” OR “docs”. This allows you to create a specialized chatbot for just a specific type of conversation with your users.
- Pro Plan Users: Use this setting in conjunction with the Site Crawler Sitemap feature to distinguish between different website content knowledge.
- Min. Similarity – Select a value between 50 and 99 to adjust the sensitivity of the Knowledge Base search during a user’s query. A lower value will search more broadly on the query (ie: look at more Knowledge Base entries) but may come back with a less accurate/more creative results. This also uses more LLM tokens and thus can be more expensive and also potentially slower. A higher value will narrow the Knowledge Base search and generally produce a more accurate result in a shorter time, but may also respond with something like “I’m sorry. Please be a little more specific, or rephrase your question.” if 0 Knowledge Base entries match. We recommend starting high (eg: around 80-85) and test the chatbot, decreasing the value until desired responses are achieved.
- Knowledge Base no match text – This text will be spoken/displayed if no matches are found in the Knowledge Base during a chatbot query. Generally it should be text to help the user ask more relevant questions.
- Allow Feedback – (Pro plan only). Off by default. Allows all users or anyone logged into WordPress with ‘editor’ permissions, to submit feedback to a chatbot response. This creates a new entry in the Knowledge Base with a Source of ‘_feedback’, and content containing the previous user message and the feedback in a Q&A format. This effectively helps ‘train’ the chatbot for future similar queries. ‘Feedback’ Knowledge Base entries can be edited/deleted using the Knowledge Base admin screen.
- Knowledge Base Source Filter – If you want your chatbot to filter it’s knowledge on a specific subset of the Knowledge Base (such as just your Technical Docs, or Blog etc) you can enter a filter in this setting. You can also enter multiple filters separated by a comma, for example: “blog,docs” will only search Knowledge Base entries that have a Source containing “blog” OR “docs”. This allows you to create a specialized chatbot for just a specific type of conversation with your users.
- OpenAI Assistant chatbot settings
- OpenAI Assistant ID – Enter the Assistant ID (usually starts with ‘asst_’) which is connected to the OpenAI API Key in the General tab. This will be the source of knowledge and responses for the chatbot. More info on OpenAI Assistants here.
- Knowledge Base chatbot settings
- Remember User Conversation – Allows users to re-join and continue on with their previous conversation with the Chatbot. This is done automatically if the user’s browser remembers the conversation (via a saved cookie). Alternatively the user can copy the URL presented on the page which will contain a parameter ‘twxchat_remember_{chatbot_id}=xxxxxx’ and use this later to re-join the conversation from any browser. Notes:
- This feature is available in all versions of the plugin, including the Free version.
- Any previous conversation entries (from the Chatlog) will be loaded into the Conversation panel upon Chatbot start, including how long ago these entries were made.
- The Thread ID cannot be used with any other Chatbot, only the Chatbot that originated the conversation.
- To remove an old Thread ID cookie from the User’s browser, the User simply visits the URL again with a blank parameter value eg: https://mysite.com/avatar-chat/?twxchat_remember_{chatbot_id}=
OR this will work also: https://mysite.com/avatar-chat/?twxchat_forget_{chatbot_id}=1
These will remove the old cookie and replace it with a new conversation Thread ID. - The option value ‘logged_in’ can be used instead of ‘true’ if the Admin wishes to restrict this feature only to logged-In WordPress Users. This is useful if the Chatbot is a special purpose chatbot and needs to track a given User’s progress and allow long-running context.
- Use Streaming – (Knowledge Base chatbots only at this time). On by default. Streaming returns responses from the LLM in chunks rather that waiting for the entire result, thus is generally quicker than non-streaming but it depends on your preferences and website configuration.
- User fields to collect – (paid plans only). If you want to collect structured data about your users/visitors (eg: User name, email address, website target audience, company industry, interests and hobbies etc) you can click the ‘Create New Field’ button and create as many User fields as you like. Fields have a ‘Name’ and a ‘Description’ component. ‘Name’ will be the actual field name that the information will be stored against and is in snake_case_format (like a WordPress slug). The ‘Description’ component is an instruction to the AI (LLM) as to what this field is and to help it detect if a user has entered this information, some examples below:
- Examples
- user_name – The Users name
- target_audience – The user’s website target audience or usual type of visitor
- business_size – The size of the user’s business (eg: small, medium, large, global)
- user_email – The user’s email address. Advise the user they can use the Conversation Panel to enter this if that is easier.
- These fields will be asked for by the chatbot (usually one-by-one in the order configured) until they are all collected, at which time the chatbot can use them to achieve it’s objectives (see above setting ‘Extra Instructions to AI Engine’).
- Flashcard Title – (Avatar chatbots only). If you want to display the collected fields back to the user in a Flashcard during the conversation, enter a title in this field, eg: “Your details”, or “User info”. This title along with the collected fields will be displayed as a Flashcard if space is available on the screen. Note: The user can simply ask to change the field values using natural language, eg: “No my name is not Craig, it’s Greg” and the LLM will change it and re-display it.
- Update Webhook URL – If you would like to trigger some action (eg: send an email, update a back-end CRM etc) upon collection of each User Field in real-time, you can enter a URL endpoint in this setting and the plugin will send the Chatbot ID, the Conversation Thread ID and the User Fields and their values to the endpoint using a HTTP POST request. Ask your developer about how to take advantage of this feature.
- Examples
- Floating Image URL – (visible only if ‘floating’ style was selected). If you wish a small picture to accompany the floating chatbot, enter a URL to your image in this setting. For floating Avatar chatbots this gets displayed when the chatbot is fully ‘minimized’.
Avatar Chatbot Settings
When a Chatbot Type of ‘avatar’ is selected, these settings will be available.
- Avatar Character – select an Avatar Character name from the dropdown list. A thumbnail image of the character will appear. Some Characters are only available in the paid plans. If the Character’s files don’t exist on your website’s server yet, you will have to click the ‘Download and Install Avatar’ button which will prompt for download. Usually Character files are around 30-40MB in total but usually load very quickly. NOTE: You are not obliged to use these Character names in your chatbot, you can name them anything you like using the Common Chatbot Settings above.
- Avatar Voice – Select the Avatar voice you want from the dropdown list. Click the ‘Test Play’ button to hear how it will sound. You will need to esnure you have an AWS Cognito Pool Identity Key in your ‘General’ settings tab in order to use these voices.
- Avatar Voice Speed – Speed up or slow down the selected Avatar Voice above by x%. You can slow down to 50% or speed up to 150%. 100 is the default. Click the ‘Test Play’ button above to hear how it sounds.
- Show Flashcards – (Knowledge Base chatbots only). If you would like the Knowledge Base Sources used in AI (LLM) queries to be displayed to the user during the chatbot response as Flashcards, located on the left of the Avatar, assuming there is enough screen real-estate, then switch this to ‘true’ (default). If there is a prominent image within a given source the image will also be rendered. Flashcards will remain visible for appx 10 seconds after which time they will disappear. Users can also close them manually.
- Avatar Splash Image URL – Enter the URL to the image you want to appear whilst the Avatar is loading and after the user Exits the chatbot.
- Avatar Background Image URL – Enter the URL to the image (must be on the local server) which will be rendered by the 3D Engine behind the Avatar during conversation.
Non-Avatar Chatbot Settings
- Voice – The Non-Avatar chatbot’s voice. Format is “provider:voice”. At present you can use OpenAI custom TTS voices found here, eg: “openai:onyx”. Note OpenAI may charge for the use of these. Browser voices can also be used such as Google Neural voices (eg: “google:Google italiano”) but the user’s browser needs to support them otherwise their default browser voice is used which may not be the desired effect. See below for the voices your current browser session supports: